PS3JB89 - PS3 Jailbreak for TI-89 Titanium - Creating Payloads
Creating PS3JB89 Payloads
Overview
To use custom payloads for PS3JB89, you need to convert a binary file of the payload data to a TI-89 Titanium custom "PAYL" (*.89y) file, transfer it to your calculator, and specify in the program's options that you want to use this payload for stage 1.
This is broken up into four steps: obtain the payload data, convert it to a "PAYL" file, transfer it to your calculator, and select it in PS3JB89's options.
Obtaining Payload Data
The PS3JB89 exploit works by transmitting a "stage 1" payload to the PS3 via the configuration descriptor of the first device attached to the exploit's virtual hub.
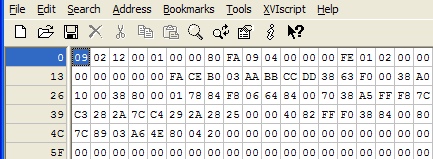
The payload file used as "stage 1" of the exploit is essentially this configuration descriptor. If you've never seen a configuration descriptor before, the first few bytes usually resemble the below's:

Some PSGroove/PSFreedom ports may specify this data in a header (*.h) file, or it might specify them in a binary (*.bin) file, which is preferred.
It's also possible you'll find payloads that don't start with the configuration descriptor (09 02 12 00 01 ...). If this is the case, you'll need to tack on the descriptor at the beginning before moving on.
An example of a binary file of payload data is the official 1.1 PSGroove payload here. Notice it has been padded to 3840 bytes, as the exploit requires.
Converting to TI-89 Titanium "PAYL" File
Once you've found/created a binary file of the configuration descriptor/payload, you'll need to convert it to a .89y file that the calculator can receive and store. You can do this with the ttbin2oth.exe command-line application that comes bundled with GCC4TI 0.96 Beta 10. Download the application and install it.
Then open a DOS command prompt (Start | Run..., type "cmd.exe", and hit [ENTER]) and navigate to the folder containing ttbin2oth.exe (usually "C:\Program Files\GCC4TI\Bin") using the "cd" (change directory) command.

Now enter the following command:
ttbin2oth.exe -89 PAYL [payload file name with extension] [max 8-character filename on calculator]
where [payload file name with extension] is the name of the binary file containing the descriptor and payload data and [max 8-character filename on calculator] is the name you want to appear on the calculator. (It will automatically be converted to lowercase.)
This will produce a .89y file for transferring to your calculator.
Transferring PAYL File to Your Calculator
Transfer this newly-created payload file to your calculator the same way you transferred the PS3JB89 program itself.
Select Payload in PS3JB89 Options
Start the PS3JB89 program on your calculator and select [F4] ("Options").

Press [UP] or [DOWN] as necessary to get to "Stage 1" and then enter the name of the file you created (the 8-character filename above). If you want to browse for it, you can press [2nd]+[-] to bring up the "VAR-LINK" menu and select the payload file. Press [ENTER] to save your changes; the application will now use this as the stage 1 payload.


